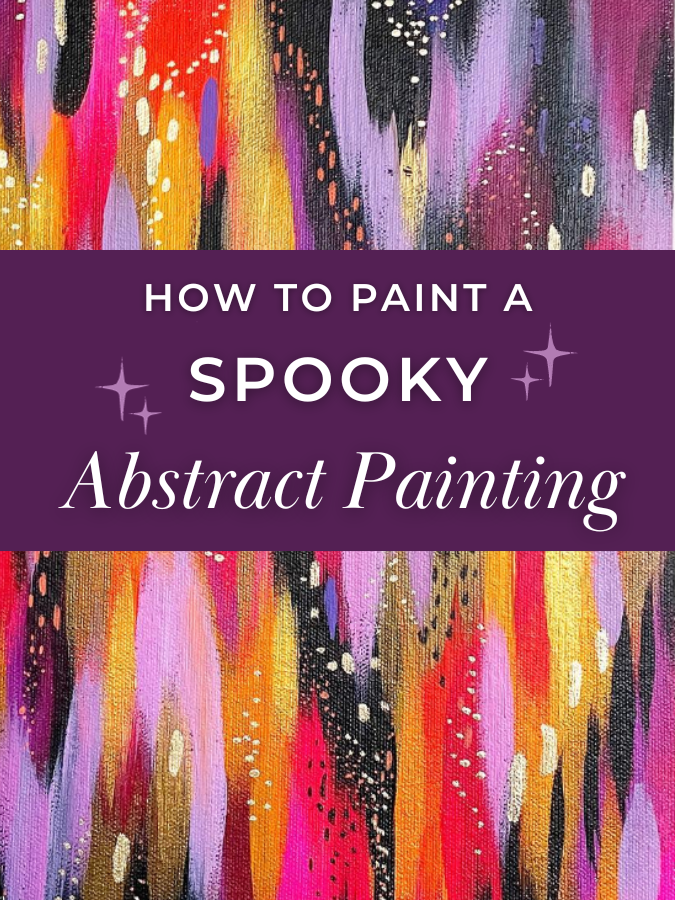
How to Paint a Spooky Abstract Painting
In this blog post, I’ll walk you through how to create an abstract painting that’s perfect for spooky season! You’ll learn how to create an acrylic abstract painting with moody vibes to complement your Halloween decor.
I’ll be sharing how to paint this on a canvas, but there are lots of ways you can create your spooky abstract! You could follow along with this tutorial to make a hand-painted pumpkin, DIY trick-or-treating bags, or Halloween cards! There are so many festive options!
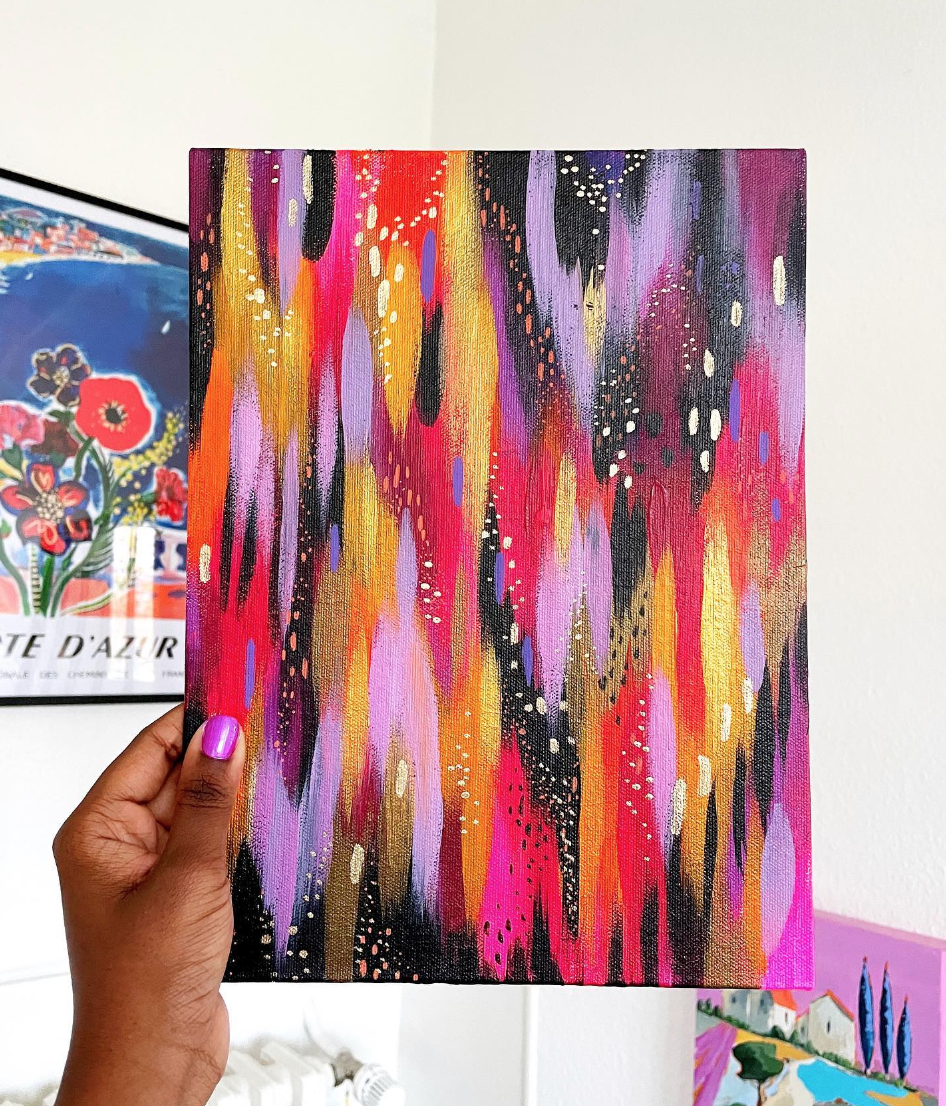
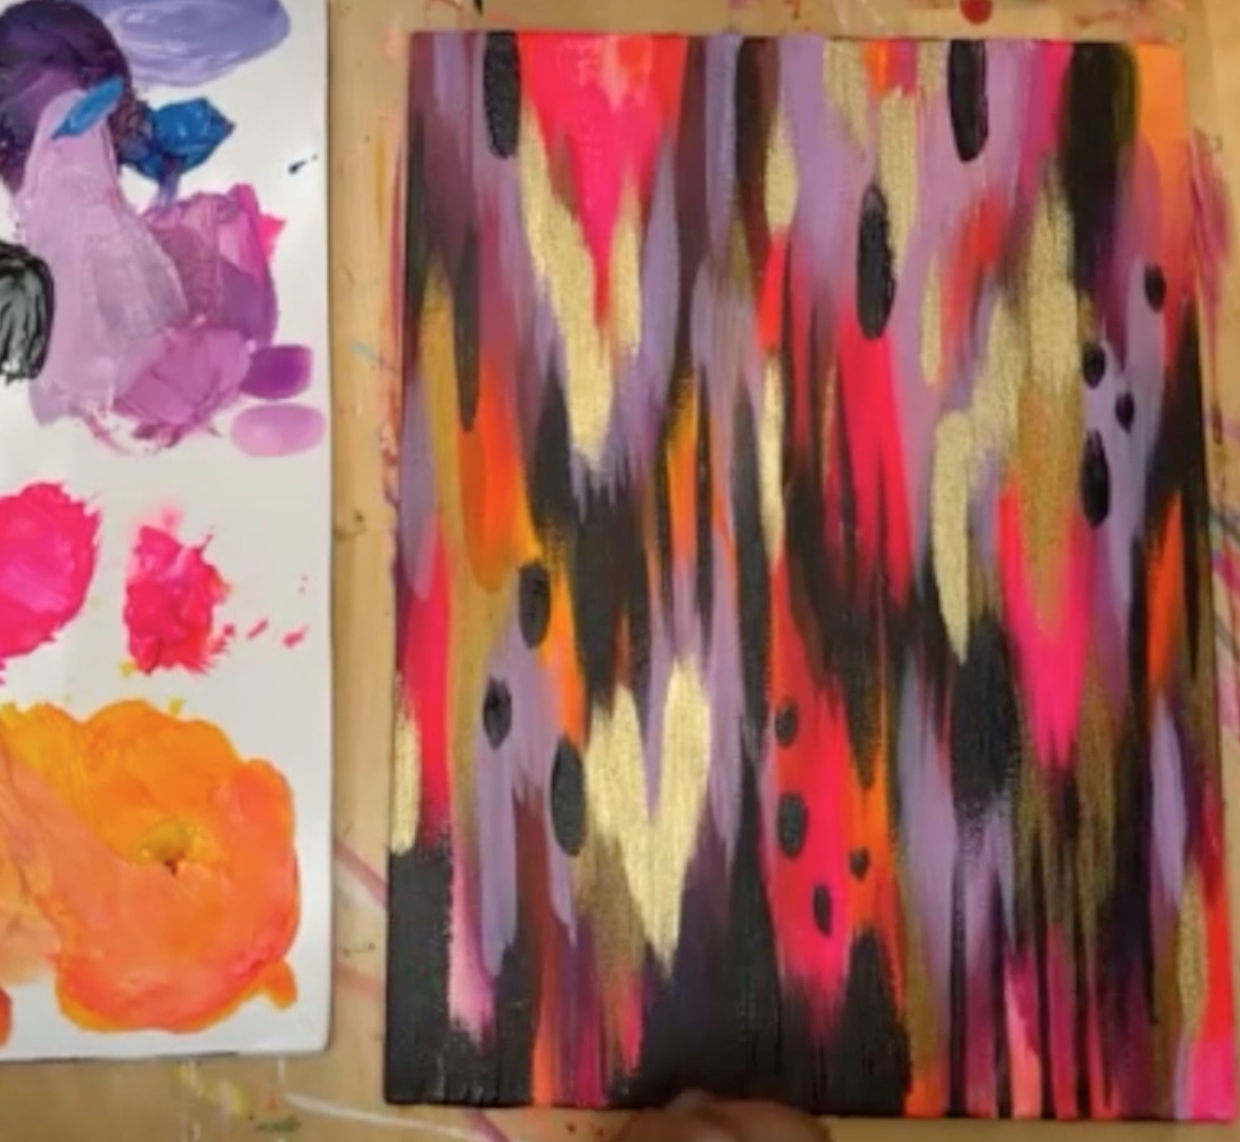
Abstract painting is all about layers and movement. We’ll be painting a lot of layers to give the painting depth and interest. And we’ll add flourishes and brushstrokes at the end to make the painting pop. By the end of the tutorial, your painting will look something like this!
Note: This tutorial is for your personal enjoyment. This image is copyrighted and cannot be recreated or sold for profit.
Before you dive in, know that you have complete creative freedom with this piece. I’m giving you a structure, but you’re free to make it your own! In fact, I encourage you to do so! If you want to use different colors than me or different accent paint strokes, go for it! I can’t wait to see what you paint!
Supplies:
Note: Some of the links in this post are affiliate links. This means if you purchase something after clicking one of my links I may receive a small commission at no additional cost to you!
Acrylic paint
My favorite paint brand is Liquitex, but you can use anything you have on hand for this tutorial.
Here are the colors I’ll be using
Titanium White
Primary Yellow
Quinacridone Magenta
Fluorescent Pink
Cerulean Blue
Ivory Black
Something to paint on
I’ll be using a canvas in the tutorial, but you can recreate this on an ornament, card, or whatever you want!
Paint brushes
You don’t need to get anything fancy here! I prefer the Simply Simmons brushes like this one. You’ll just want to make sure that you have a large, medium, and small brush.
Gilding wax
Gilding wax is a metallic wax substance that gives a gold shimmer like no other art supply! Here’s a link to my favorite brand!
Acrylic paint pens
These are optional, but they’re great for adding details and flourishes at the end of the piece. My favorite brand to use is Posca!
Step 1: Mix Your Colors
Before you begin, you’ll want to mix your paint. The majority of this piece consists of oranges and purples which need to be mixed from the colors on the supply list.
For the oranges, we’ll create a darker orange and a more vibrant orange. To mix the darker orange, start with a base of Primary Yellow and add Magenta in little by little. To mix the vibrant orange, start with a base of Primary Yellow and mix in some Fluorescent Pink. You can also add a little Titanium White to each of these mixes to create a lighter-tinted orange.
For the purples, we’ll do the same thing – mix a darker purple and a more vibrant, warm purple. For this you’ll start with a base of either Magenta or Fluorescent Pink and add in Cerulean Blue little by little.
If you are totally new to paint mixing and color theory, I’d encourage you to check out this post first, and then come back so you’ll be more familiar with the process!
Here’s how my palette looked before I started painting.

Step 2: First Layer - Underpainting
I always start my paintings with a watery underpainting. This helps me map out the composition and gives the painting a nice base. Start by painting V-shaped brushstrokes using a watery mix of Primary Yellow.
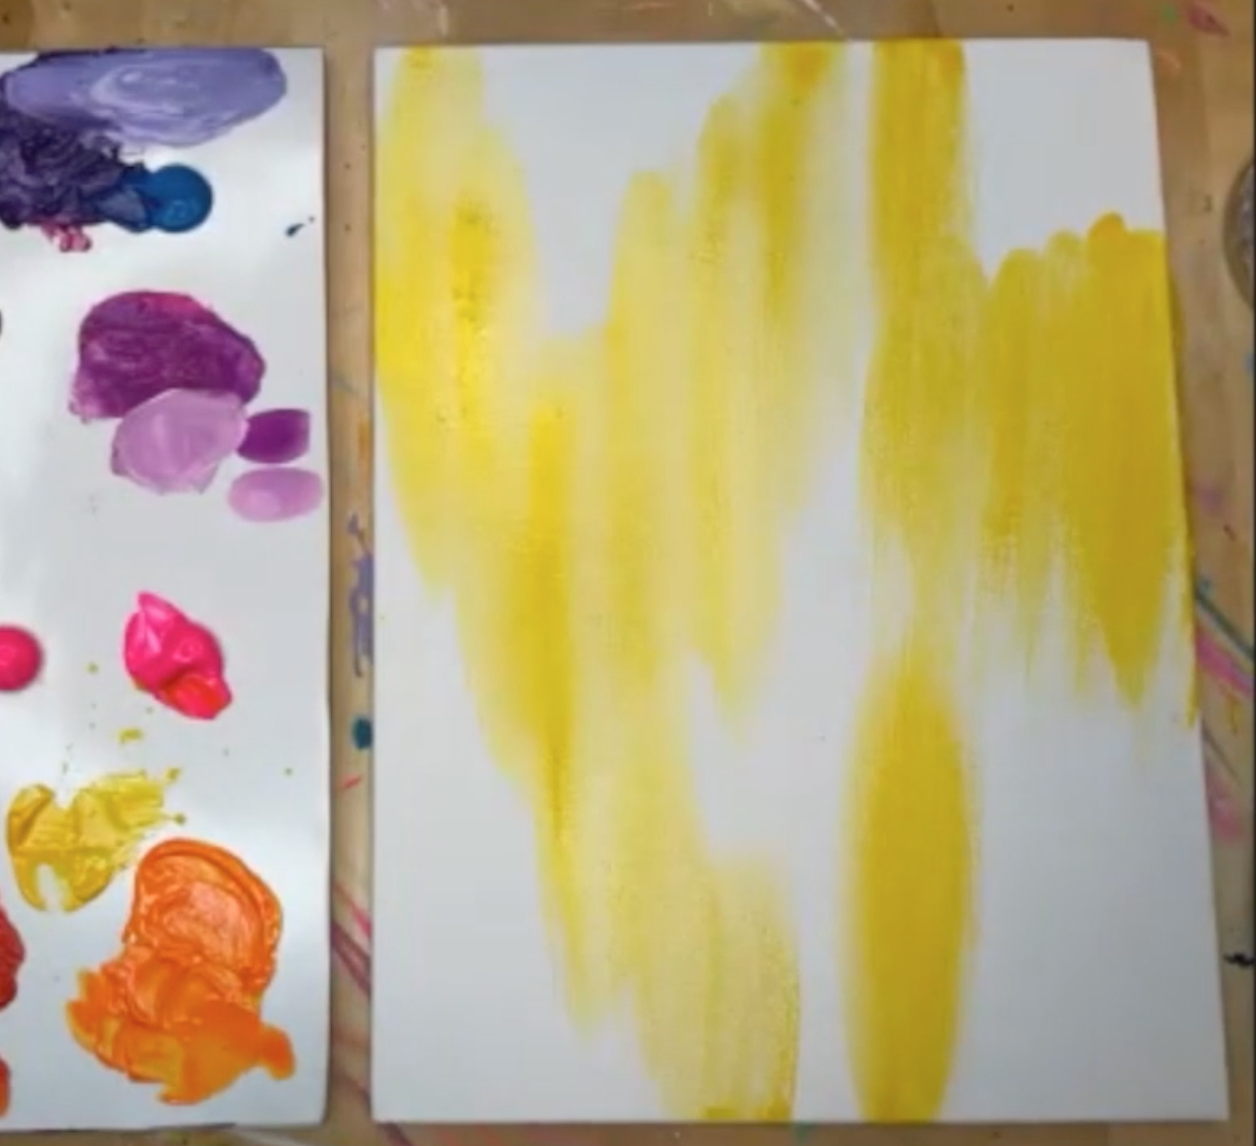
Then mix some water into your Fluorescent Pink and add hits of that throughout the canvas. Finish it up with a watery mix of Magenta to give the painting some depth. Think about the movement and shapes you want to create in your painting as you’re working. This underpainting will be the foundation of your painting’s composition.

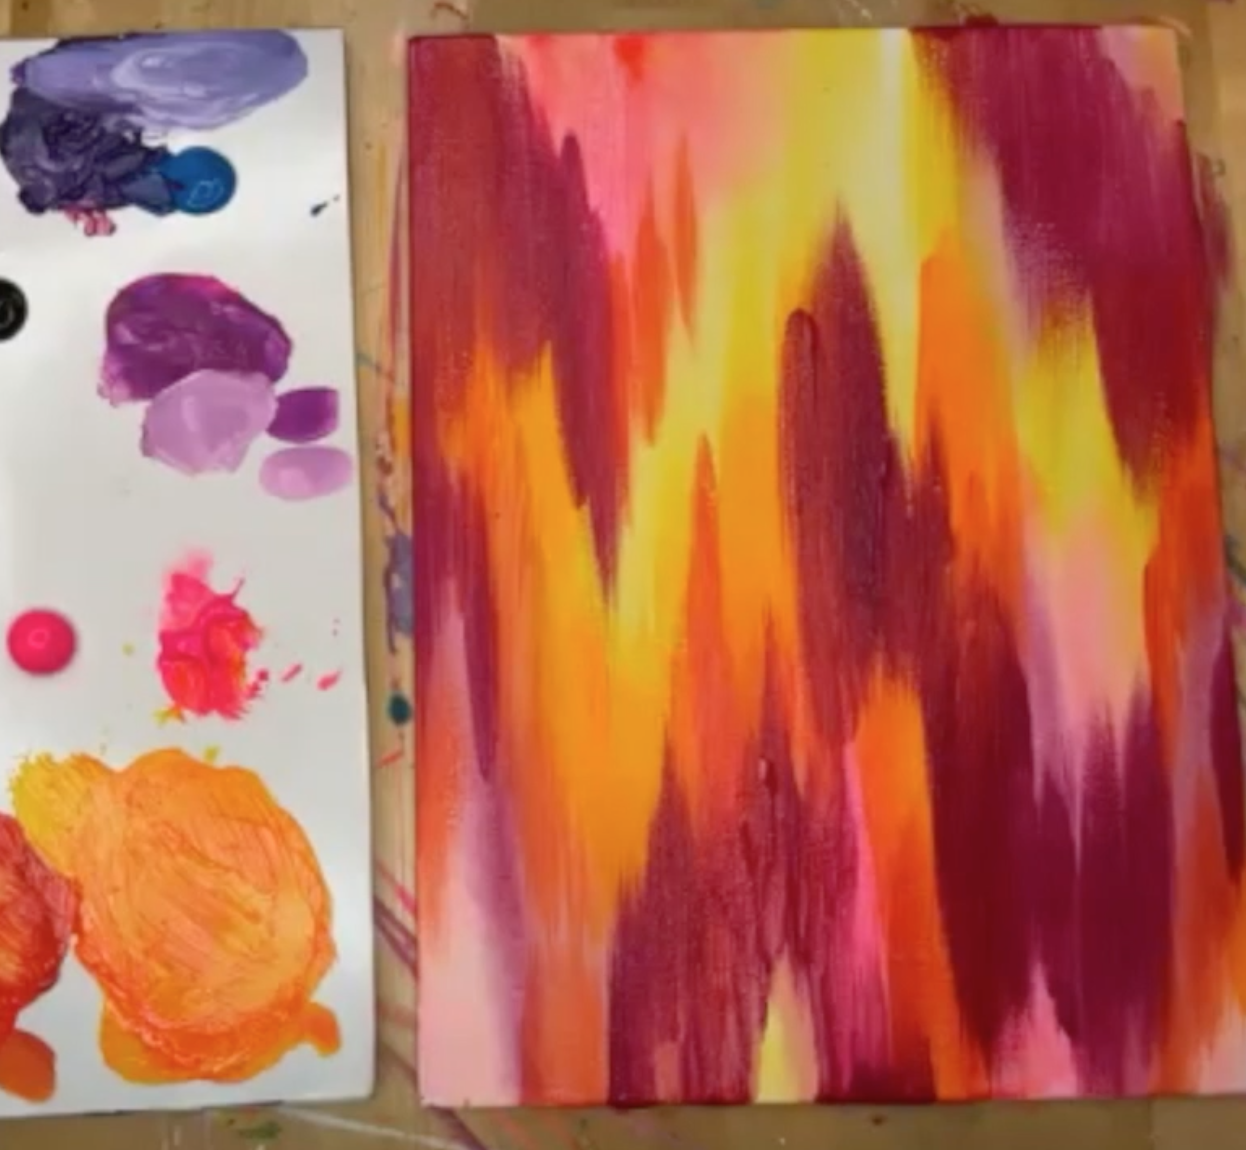
Step 3: Second Layer - Warmer Colors
Once your first layer is dry it’s time to move on to building the opaque layers that will make up the rest of the painting. Start with the warm colors - oranges, Fluorescent Pink, and Magenta.
I started by adding both light and dark orange in the areas where there was yellow on my underpainting. Keep using a “down up” motion to create V-shaped brushstrokes with a lot of movement. Don’t be afraid to lay your oranges on top of each other to get cool blends throughout the painting.

Next, add Magenta to give the painting some extra depth. It’s ok if these brushstrokes overlap with some of your orange ones. I followed the darker areas on my underpainting as a guide to where to put my magenta.
Step 4: Third Layer - Cool/Dark Colors
Now, it’s time to repeat the process with the darker and cooler colors. It’s important for each layer to be mostly dry before you paint on top of it with the next layer.
I rarely use black in my paintings, but for this spooky painting, I knew I had to make a bold move and incorporate some black! I like for my paintings to feel “anchored” and adding darker colors toward the bottom can help with that. In this instance, I started by adding black brushstrokes to the bottom of the canvas. Then I added them throughout the painting to balance things out and help guide the viewers’ eye.
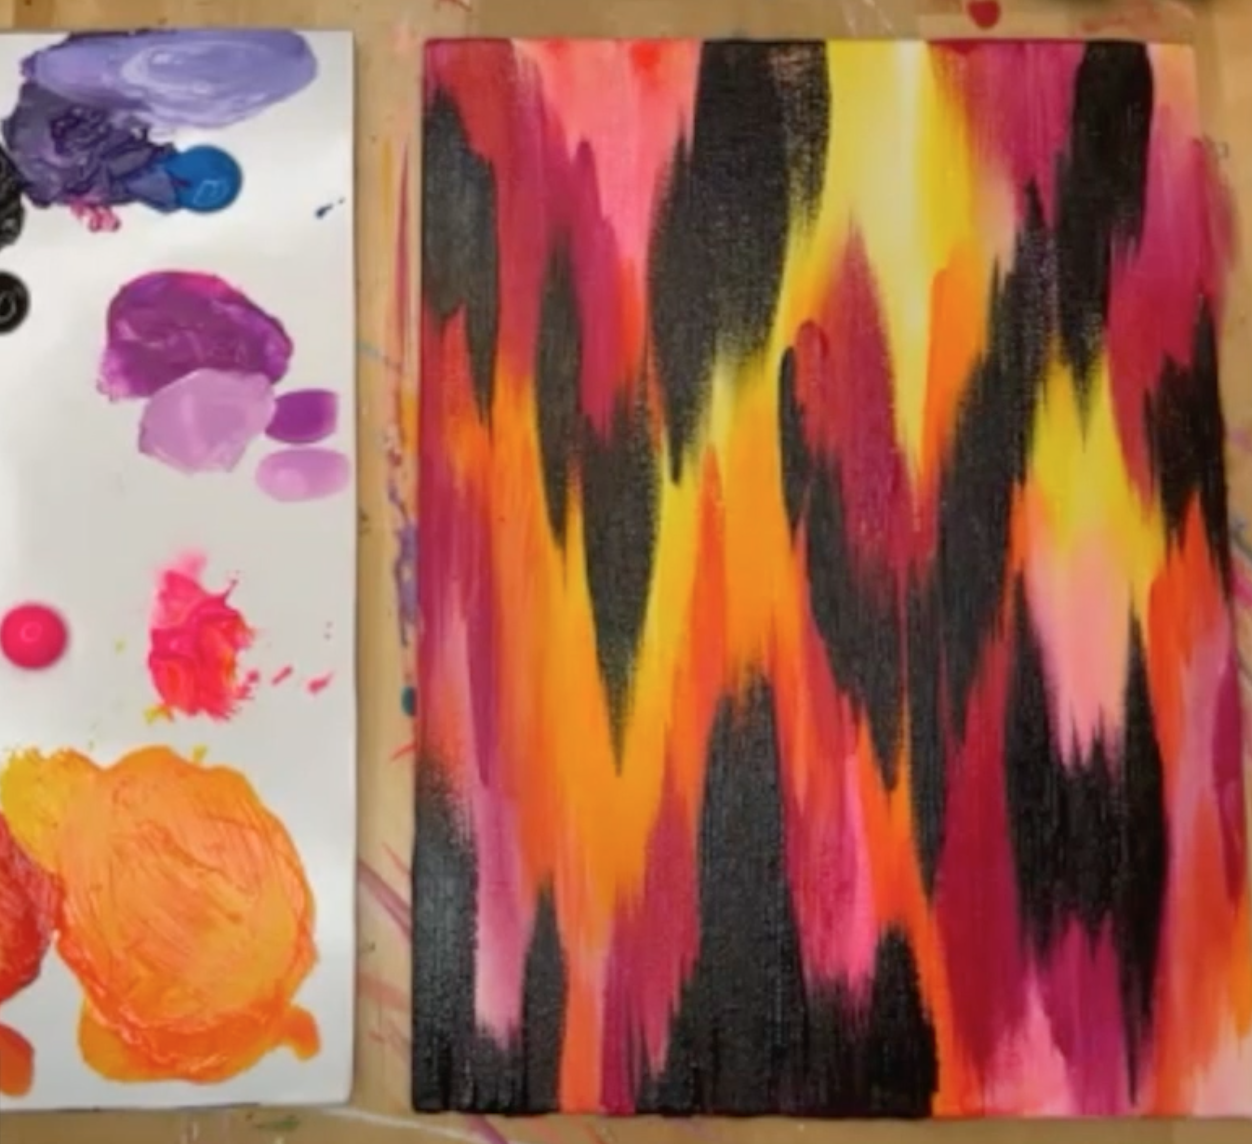
The dark purple really complements the black and ties in the whole spooky theme, so start to lay down some purple areas near your black brushstrokes. Make sure to leave room for your gorgeous first layer to poke through as well! The whole point of working in layers is to give the painting lots of depth and movement, so even as we build up new layers, we want to make sure that parts of the previous layers are still visible.

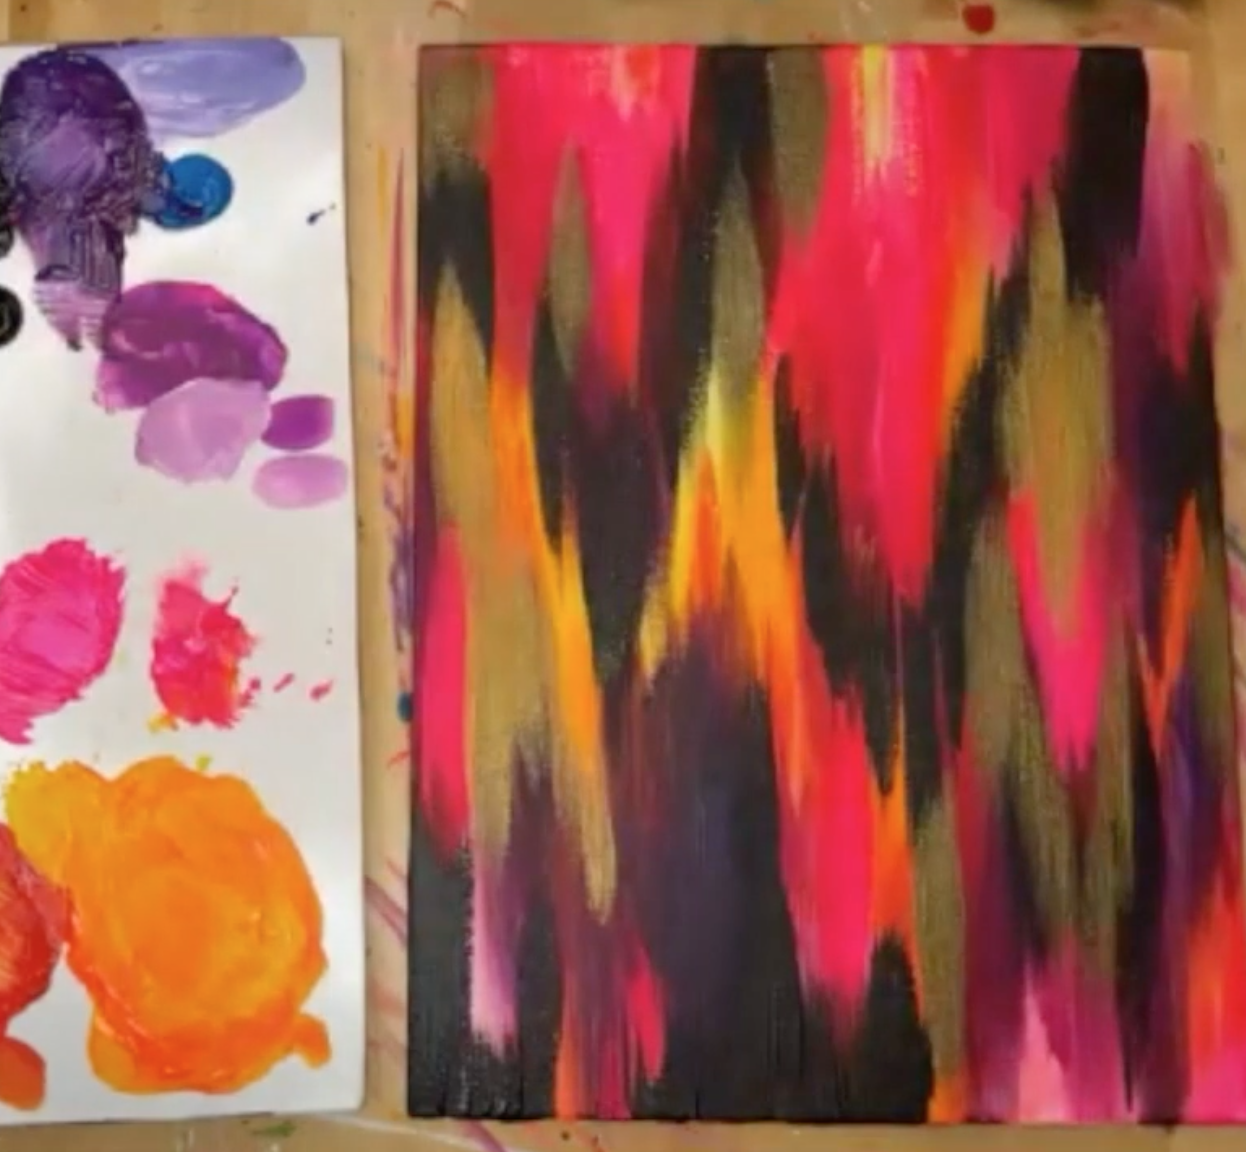
Step 5: Fourth Layer - Gold Paint
Next, try adding a few hits of gold paint throughout the painting to add a little metallic shine to your spooky painting. Gold contrasts nicely with the black, so I added my gold areas near and on top of my black brushstrokes.
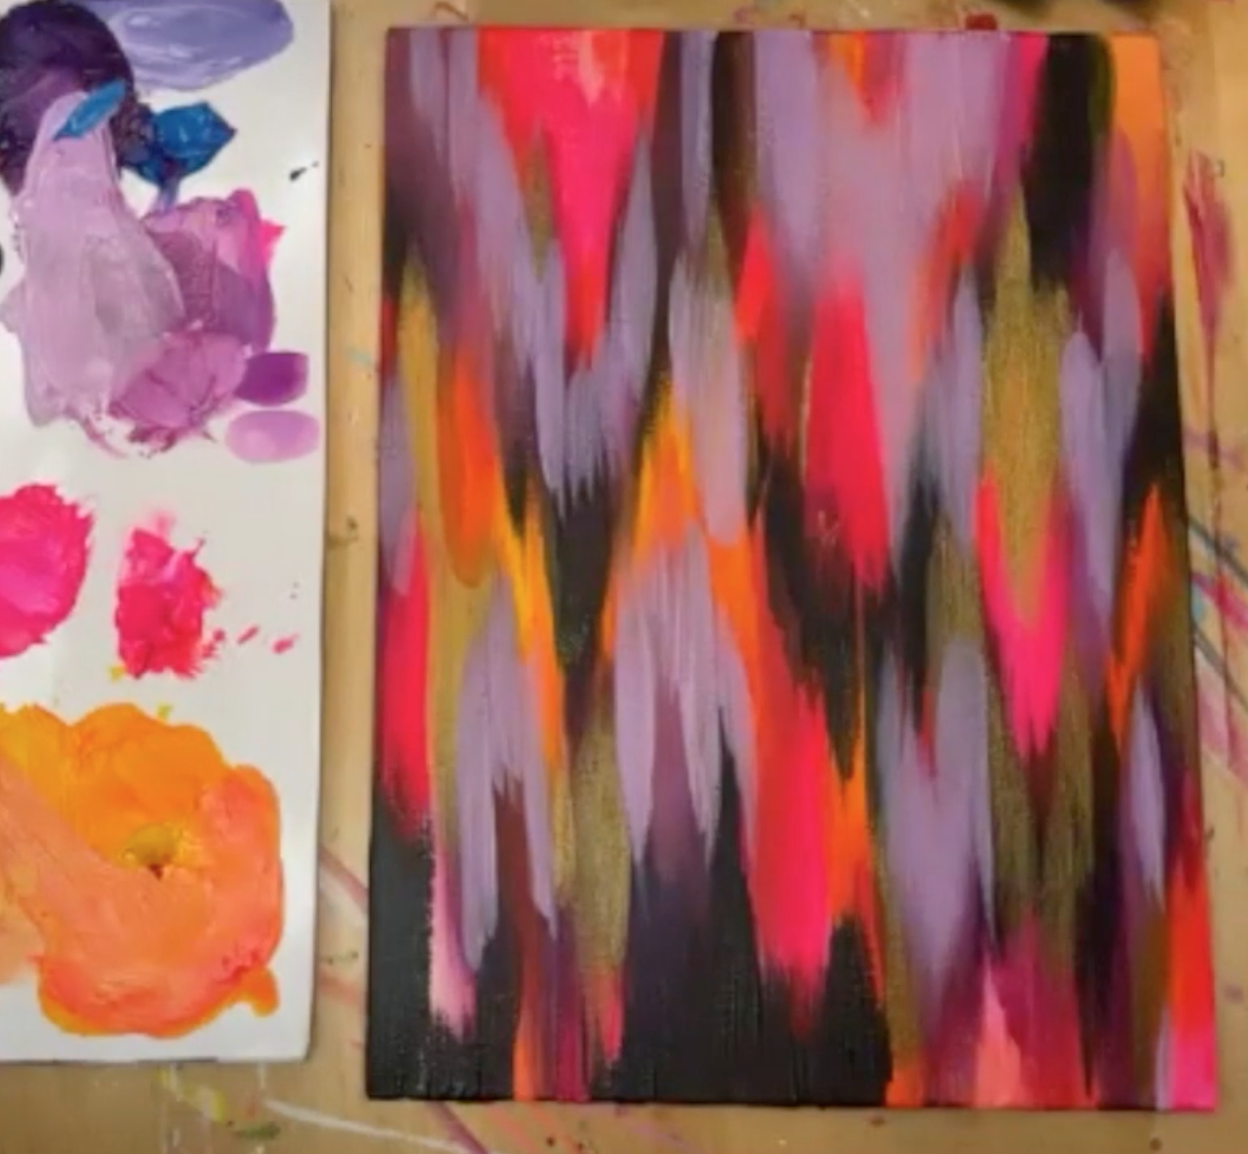
Step 6: Fifth Layer - Smaller Brushstrokes to Bring it All Together
Now that your canvas is covered and the main composition has taken shape, it’s time to add some smaller accents to bring even more depth and interest to the piece. Ask yourself what colors are missing and start to add those. In my example, I wanted to bring in some light purple and more orange to brighten it up and give it a more mystical look.
This is the last step before you’ll move onto adding the finishing flourishes to your painting, so make sure you’re happy with the color story and how the piece is moving.
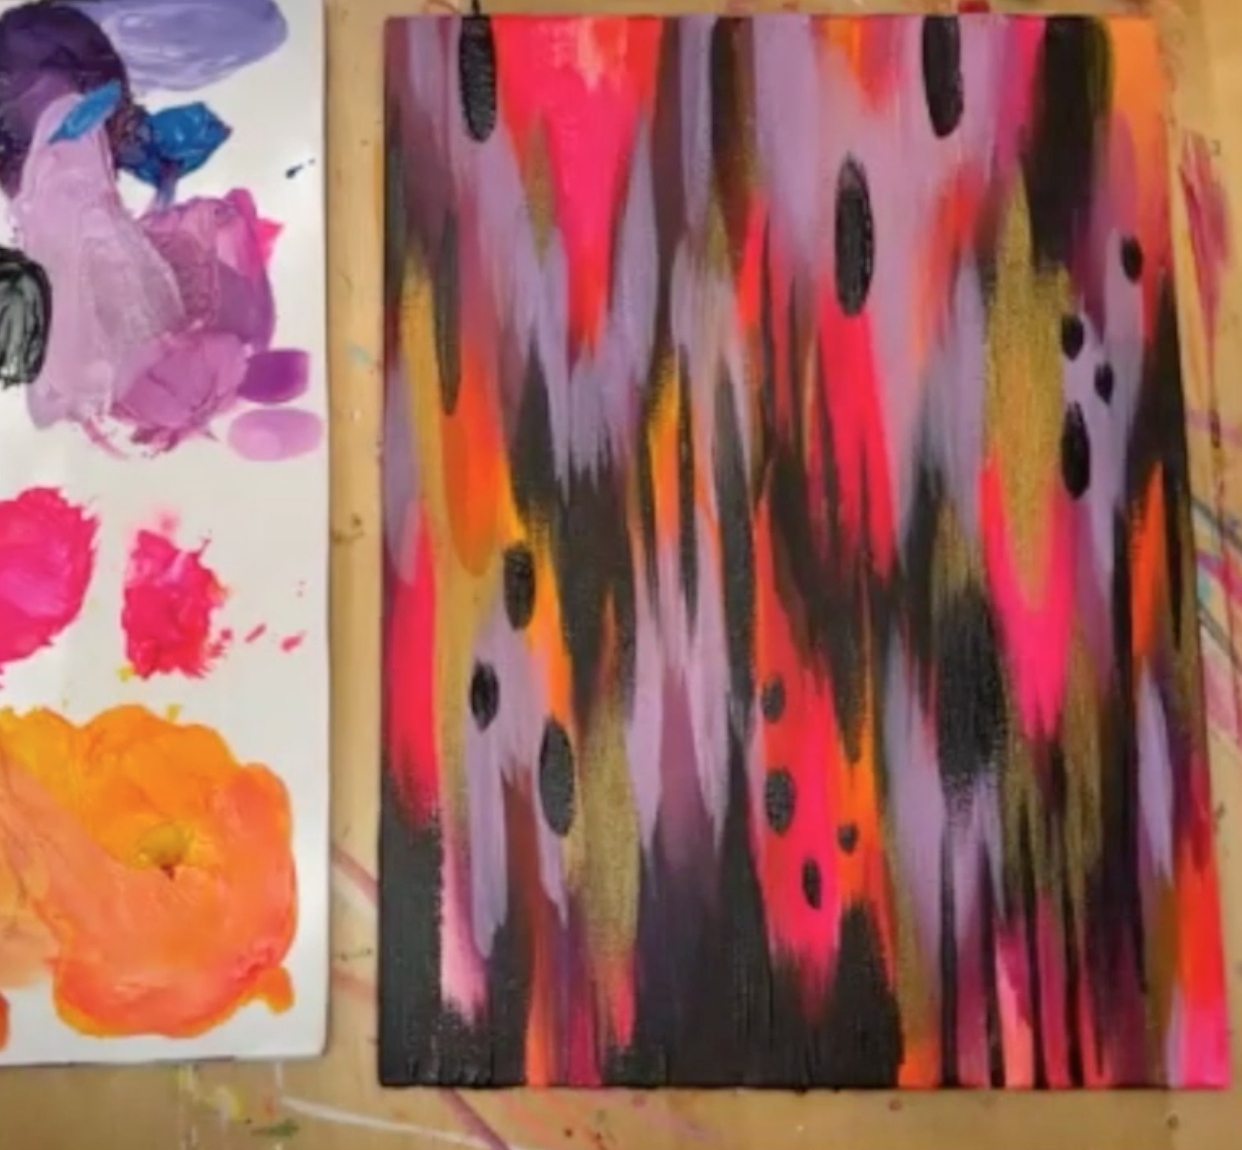
Step 7: Final Layer - Flourishes
Now it’s time for my favorite part - flourishes! This is the step that will really bring your whole piece together. It’s the decoration step! We built the foundation of the painting, and now it’s time to decorate it!
I love to add stripes to my paintings, and stripes are a great tie-in to Halloween as well. (It’s giving Jack Skellington vibes!) I did my stripes in black, but feel free to pick whatever color you like! Just make sure it contrasts with the background so the flourish pops!

Another great way to add flourishes is with short, expressive brushstrokes. Think of it like brushstroke polka dots! Again, use colors that contrast with the background for the biggest impact!
My favorite way to add extra shimmer and shine to my paintings is with gilding wax. I’m using a gold gilding wax in this example, and it takes the spooky painting to the next level. If you’ve never used gilding wax before, I highly recommend it. It’s a metallic wax that can be painted on just like regular paint, but it has a much more vibrant and shiny appearance.
You can see how much brighter it is compared to the gold metallic paint we used earlier.
Now it’s time for the finishing touches. I like to use paint pens like Posca Pens to add smaller detail lines and dots throughout my painting.
Since this is a spooky-themed abstract painting, think of icons and vibes associated with Halloween and let them inspire your final flourishes. I was inspired by bubbling potions and the spooky night sky!

Et Voilà! Your spooky masterpiece is complete!
At the end of the day, I want you to feel empowered to make this piece your own. Don’t be afraid to make a bold move and add some elements that feel unique to you!
I would LOVE to see what you made! Share your painting on Instagram and tag me @ettavee so I can see what you made!
Want more abstract painting instruction? Join me in my abstract painting class, Joyful Abstracts, for an in-depth art class where I walk through my entire abstract painting process from start to finish. You’ll learn how to gather inspiration, how to sketch out your composition, what colors to choose, how to paint a balanced abstract, and how to varnish your painting so it will last a lifetime!
xo, Jessi

Pin this post for later! 📌
Hover or tap on this image and click the “Save” button on the top left!